The "Sync and Pray" Problem: Why Manual Multicam Is a Bottleneck for 3+ Camera Setups
You know the drill. You've got six camera angles, a dedicated audio track from the mixer, and a producer who wants a first cut by end of day. You drop everything into a sequence, create a multicam clip, and then you sit there — manually scrubbing, manually cutting, manually babysitting every speaker transition like it's 2009.
This is the "sync and pray" workflow. You sync on audio waveforms, you nest your multicam clip, you enable multicam view, and then you pray that your active speaker detection instincts are fast enough to keep up with a six-person panel discussion. They're not. Nobody's are.
The core problem with Premiere Pro's native multicam toolset is that it was designed for a world of two-camera interview setups. Camera A on the host, Camera B on the guest. Cut back and forth. Done. That paradigm is dead for anyone editing high-end podcasts, roundtables, or corporate panel discussions in 2024.
When you scale past three speakers, manual multicam editing stops being a workflow and starts being a punishment. You're dealing with checkerboarding across your timeline — gaps, overlapping audio, misaligned cuts — because the human brain simply cannot process six simultaneous video feeds and make accurate cut decisions at real-time playback speed. The result is an edit that either feels robotic because you're cutting too mechanically, or it feels sloppy because you're missing reaction shots and natural pause points.
The industry needed a solution that understood speaker detection at a computational level. What it got, mostly, were cloud-based subscription tools that cap out at four cameras and charge you monthly for the privilege.
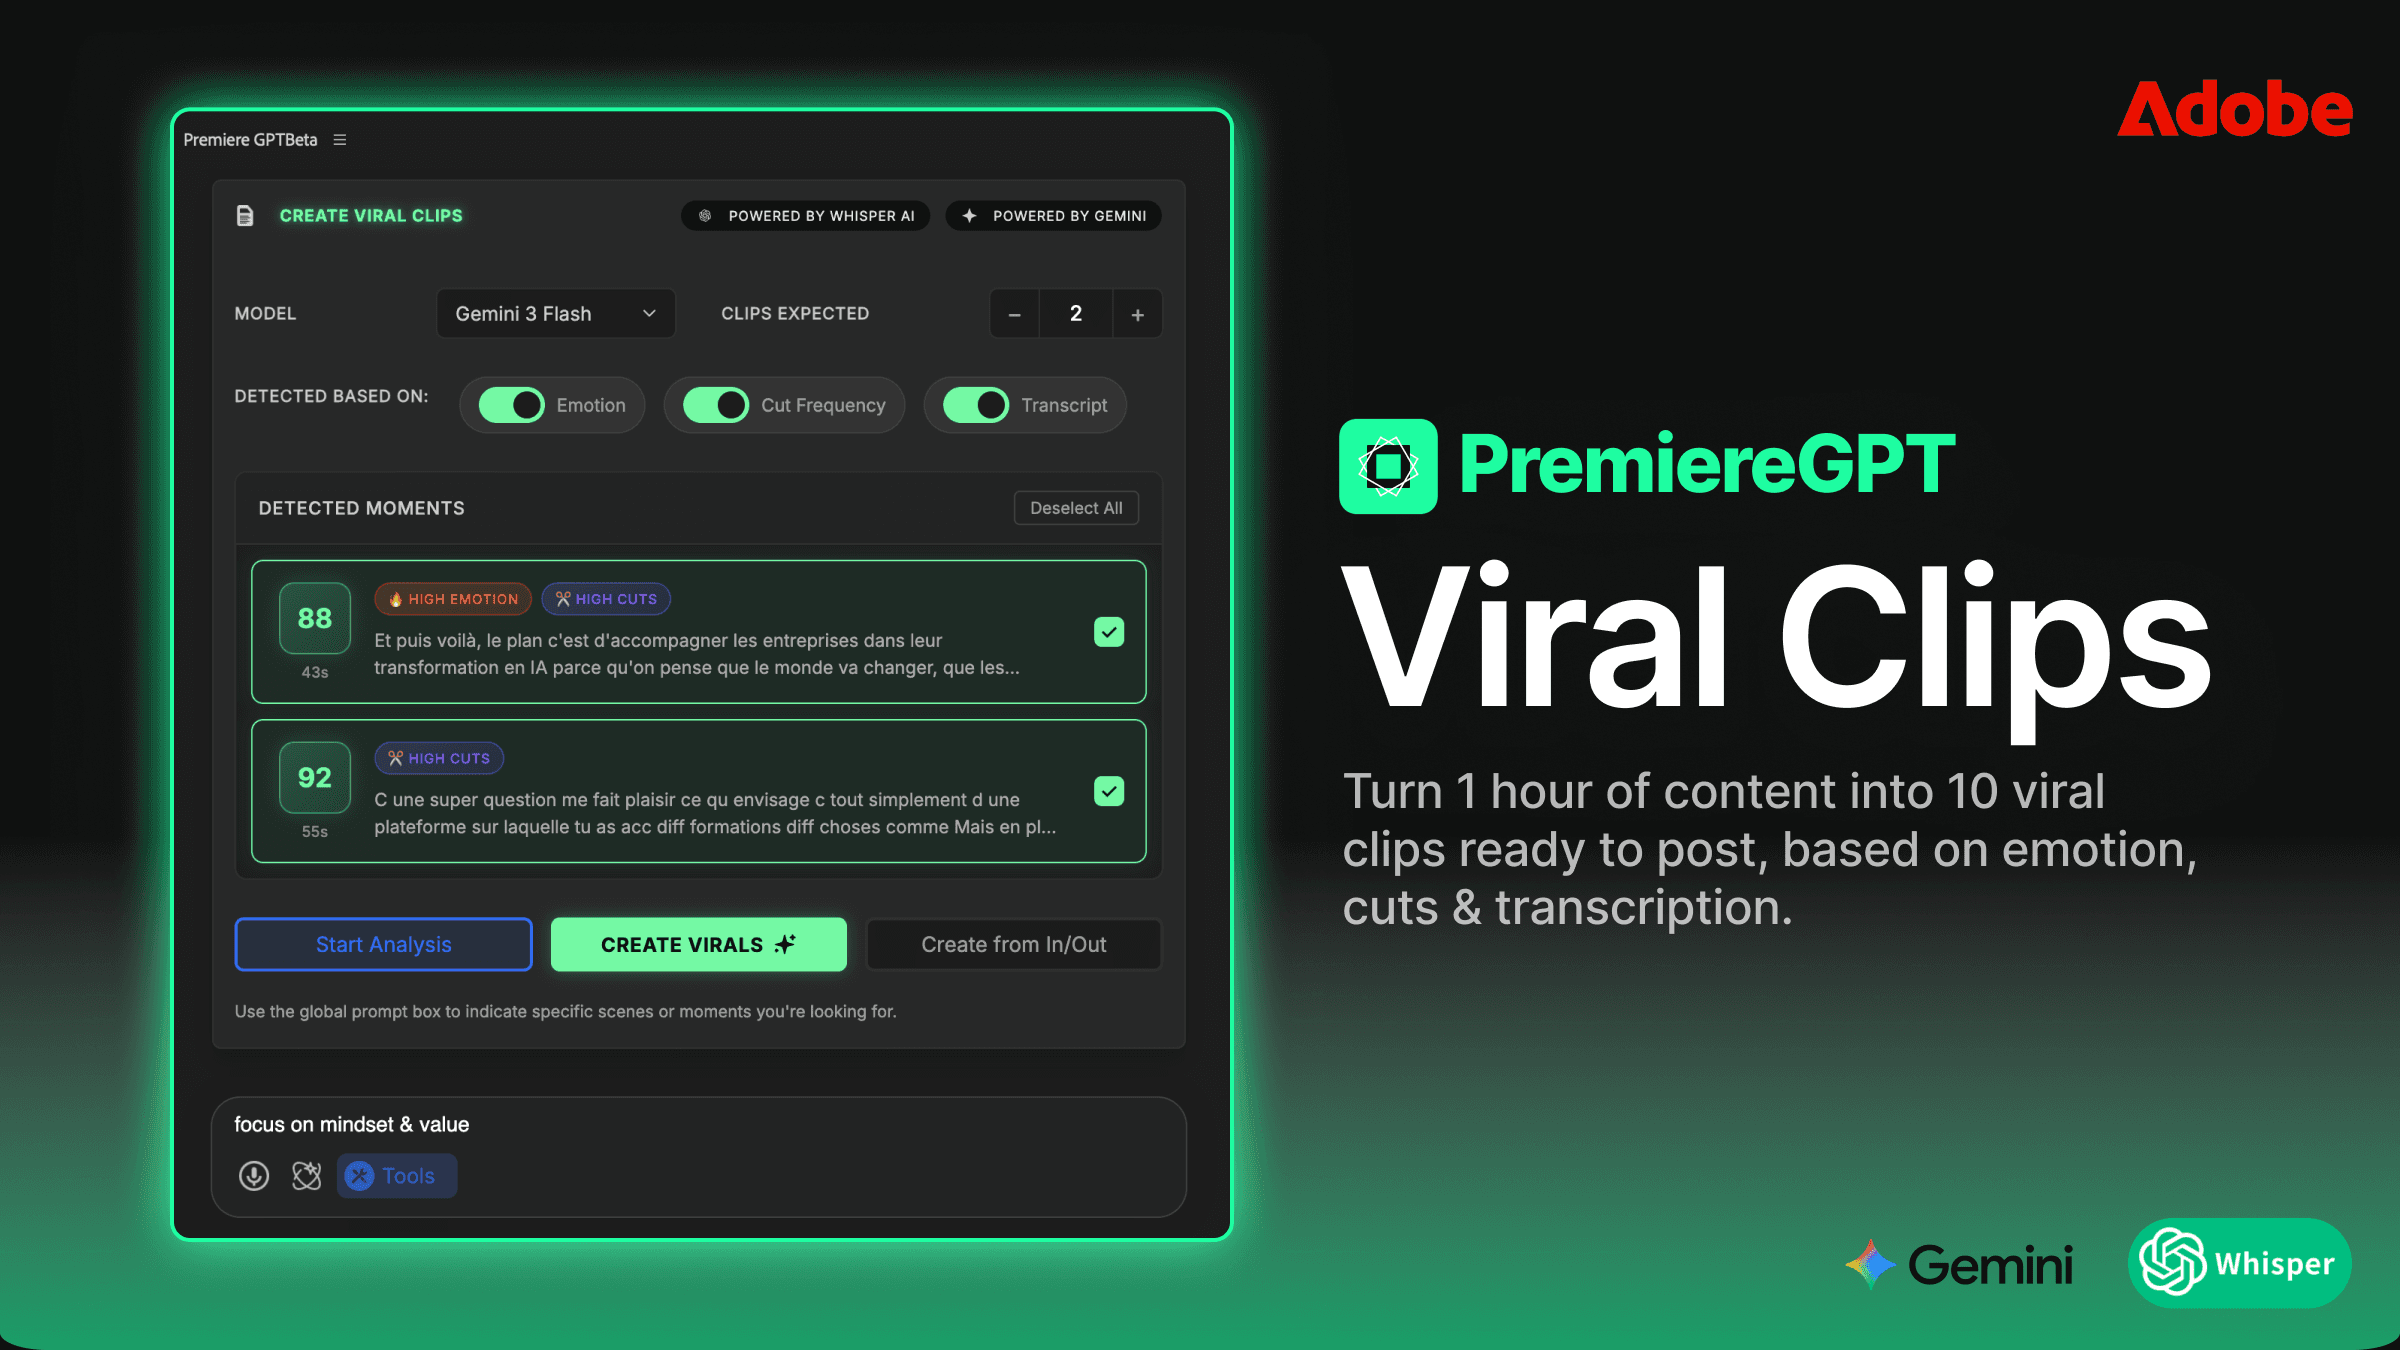
Why 10 Speakers Is the New Standard
The podcast format has evolved. The two-person interview is still alive, but the content that's pulling serious viewership numbers right now is panel-format: five, six, eight people around a table, each with a dedicated camera and a dedicated audio track. Think political roundtables, tech industry panels, sports commentary shows, corporate all-hands recordings, and academic symposiums.
These productions aren't being shot by amateurs. They have dedicated camera operators, sound engineers running a proper mix-minus setup, and post-production workflows that need to match the production quality of the shoot. And yet, the editing tools available to the post team cap out at three or four cameras — or they require you to upload your raw footage to a server farm you know nothing about.
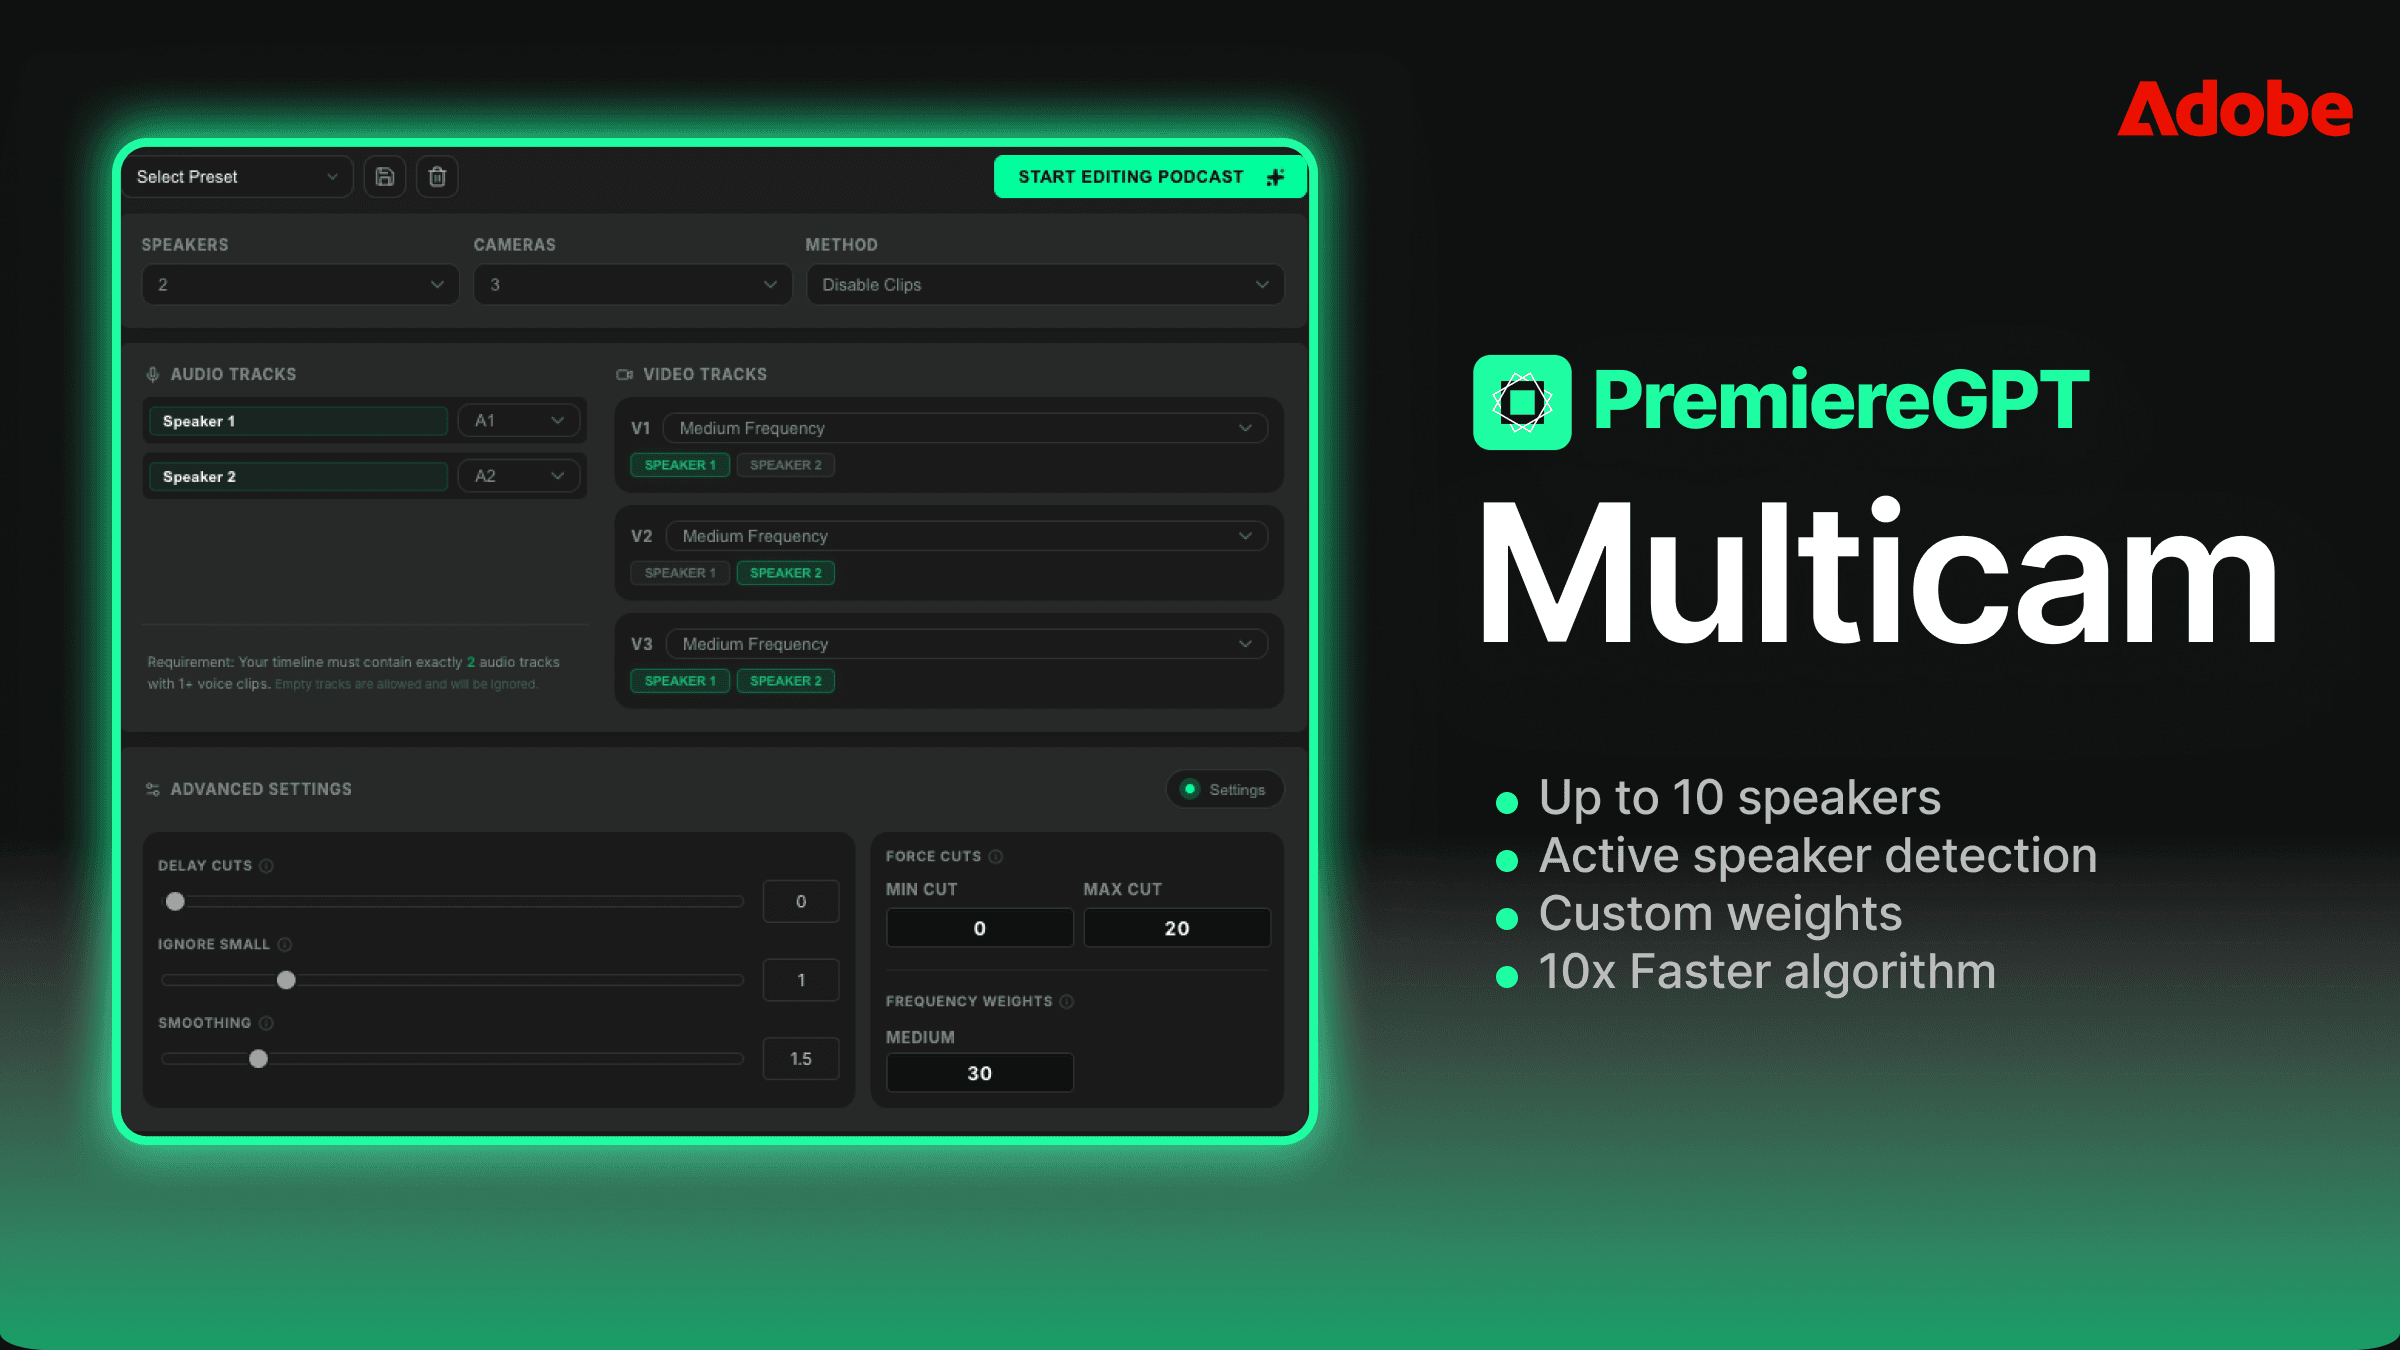
Supporting up to 10 simultaneous speakers isn't a marketing number. It's the actual threshold where professional panel productions live. A 10-person roundtable with one camera per participant plus one or two wide shots is a completely realistic production scenario. If your multicam tool can't handle that natively, you're either splitting the job into multiple passes — which destroys your timeline organization — or you're doing it by hand, which destroys your schedule.
The 10-speaker ceiling is where serious podcast post-production actually operates. Any tool that doesn't meet that spec is a prosumer tool wearing a professional label.
The 10x Speed Advantage: Local Processing Beats Cloud Every Single Time
Here's a number worth examining: cloud-based multicam tools that require you to upload footage before processing introduce latency that is entirely artificial. You're not waiting for computation. You're waiting for upload, queue processing, download, and re-sync. On a 4K, 10-camera shoot with an hour of footage, that pipeline can eat 45 minutes to over two hours depending on your internet connection and the platform's server load at that moment.
A local algorithm running on your own machine — even a mid-range workstation — eliminates every single one of those latency sources. The processing happens against files that are already on your drive. There's no upload queue. There's no "your project is number 47 in line." There's no re-download. The algorithm reads your audio tracks, performs active speaker detection, and writes the cut decisions directly into your Premiere Pro timeline in a fraction of the time.
The "10x faster" benchmark isn't hyperbole when you're comparing against cloud workflows. It's actually conservative when you factor in the full round-trip time of a cloud-based tool on a large multi-camera project. Local processing respects your time in a way that cloud pipelines structurally cannot.
Privacy Is Not a Plugin Feature
Let's talk about something the subscription tools don't put in their feature comparison tables: where your footage actually goes.
When you use a cloud-based multicam editing tool, your raw, unedited footage leaves your machine. It travels to servers operated by a third party. It sits in storage you don't control, processed by infrastructure you have no visibility into. For editors working on consumer content or personal projects, this might feel like an acceptable trade-off. For professional editors handling high-profile clients, it is a direct violation of standard NDA terms.
Think about what "raw footage" actually contains. It contains outtakes. It contains off-the-record conversations that happen before the record light goes on. It contains proprietary product discussions, unreleased announcements, private health disclosures, and legally sensitive content that your client has explicitly trusted you to protect. Your NDA with that client doesn't have a carve-out for "unless you use a cloud-based editing plugin."
Editors working with political figures, C-suite executives, medical professionals, legal commentators, or any talent with a public profile cannot afford to treat footage security as an afterthought. The moment your raw files touch a third-party server, you have introduced a breach vector that your contract almost certainly prohibits.
Local processing isn't a nice-to-have. For any editor operating at a professional level with professional clients, it is a non-negotiable requirement. A tool that runs entirely on your machine, reads your local files, and never phones home is the only tool that is actually compatible with professional-grade client confidentiality obligations.
Killing the Subscription Bloat: $59 Lifetime vs. $300/Year in Recurring Rent
Let's do the math that the subscription tools hope you won't do.
The dominant cloud-based multicam automation tools in the Premiere Pro ecosystem currently price their professional tiers at approximately $25 to $30 per month. That's $300 to $360 per year. Over three years — a completely normal software lifecycle — you've spent between $900 and $1,080 for a tool that you still don't own, that can raise its price at any renewal cycle, and that can sunset its product and leave you with nothing.
A one-time $59 lifetime license breaks even against a $30/month subscription in under two and a half months. Every month after that is pure savings. Over three years, the delta between a $59 lifetime purchase and a $360/year subscription is over $1,000. That's a lens rental. That's a new SSD array. That's a month's worth of client invoices that you're currently handing directly to a software company in exchange for access to a tool you should own outright.
The subscription model made sense when software required constant server-side infrastructure to function. A locally-processed Premiere Pro plugin does not require that infrastructure. The subscription pricing on cloud-dependent tools is partly a legitimate infrastructure cost and partly a business model that has normalized the idea of renting tools that should be purchased. Editors who recognize this distinction and choose accordingly are making a financially rational decision, not a compromise.
Fine-Tuning the Cut: Speaker Frequency and Min/Max Cut Controls
Automated multicam cutting has a reputation problem, and it's earned. Early tools produced cuts that felt like they were edited by a robot having a mild panic attack — rapid-fire switches, no sense of rhythm, no understanding of conversational pacing. The result was technically correct and creatively unwatchable.
The solution is parameter control. Specifically, two controls that separate a professionally-tuned automated cut from a mechanical one: speaker frequency weighting and minimum/maximum cut duration settings.
Speaker frequency weighting allows you to tell the algorithm how aggressively to prioritize the active speaker. In a high-energy debate, you want fast, reactive cuts. In a thoughtful academic discussion, you want the algorithm to hold on a speaker longer, let the thought complete, and cut on natural pause points rather than the first detected audio peak. This is not a binary on/off — it's a dial, and knowing how to set it for your specific content format is the difference between an automated cut that needs 20 minutes of cleanup and one that needs two.
Minimum and maximum cut duration controls are equally critical. Setting a minimum cut duration of, say, 1.5 seconds prevents the algorithm from generating cuts so fast they read as jump cuts rather than camera switches. Setting a maximum cut duration prevents the edit from camping on a single camera angle so long that the viewer forgets other participants exist. These two parameters, tuned correctly for your format, give the automated edit a human feel — because they're encoding the same instincts a skilled editor uses when cutting manually, just at machine speed.
The goal isn't to remove the editor from the process. It's to handle the mechanical heavy lifting so the editor can focus on the 5% of cuts that require genuine creative judgment.
From Raw Sync to Final Cut in 60 Seconds: A 10-Camera Automated Workflow
Here's what the actual workflow looks like when you're running a 10-camera setup through a properly configured local multicam plugin in Premiere Pro.
Your pre-production discipline matters here — and we'll come back to that. Assuming your tracks are properly named and your audio is clean, the process is as follows:
Ingest and sync: Drop all 10 camera angles and your dedicated audio tracks into your Premiere Pro project. If you're running a mix-minus setup, your individual speaker tracks are already isolated. Sync to timecode or audio waveform — the plugin handles both.
Select your sequence: Highlight the synced sequence or your multicam clip in the timeline. The plugin reads the track structure directly — no export, no intermediate file, no round-trip to a cloud server.
Set your parameters: Speaker frequency, minimum cut duration, maximum cut duration. For a 10-person panel, a minimum cut of 1.2 seconds and a maximum of 8 seconds is a reasonable starting point. Adjust based on the energy level of your specific content.
Run the algorithm: The active speaker detection engine analyzes your audio tracks, identifies the dominant speaker at each point in the timeline, and generates cut decisions. On a local machine, this analysis runs against your files in real time — no queue, no upload, no wait.
Review the output: The plugin populates your timeline with camera switches mapped to active speaker transitions. Your checkerboarding is resolved. Your wide shots are placed at natural lulls. The mechanical work is done.
The 60-second benchmark is realistic for a standard panel recording of moderate length. Longer recordings scale proportionally, but the local processing speed means you're never waiting on infrastructure — only on the algorithm itself, which is doing real work on real data.
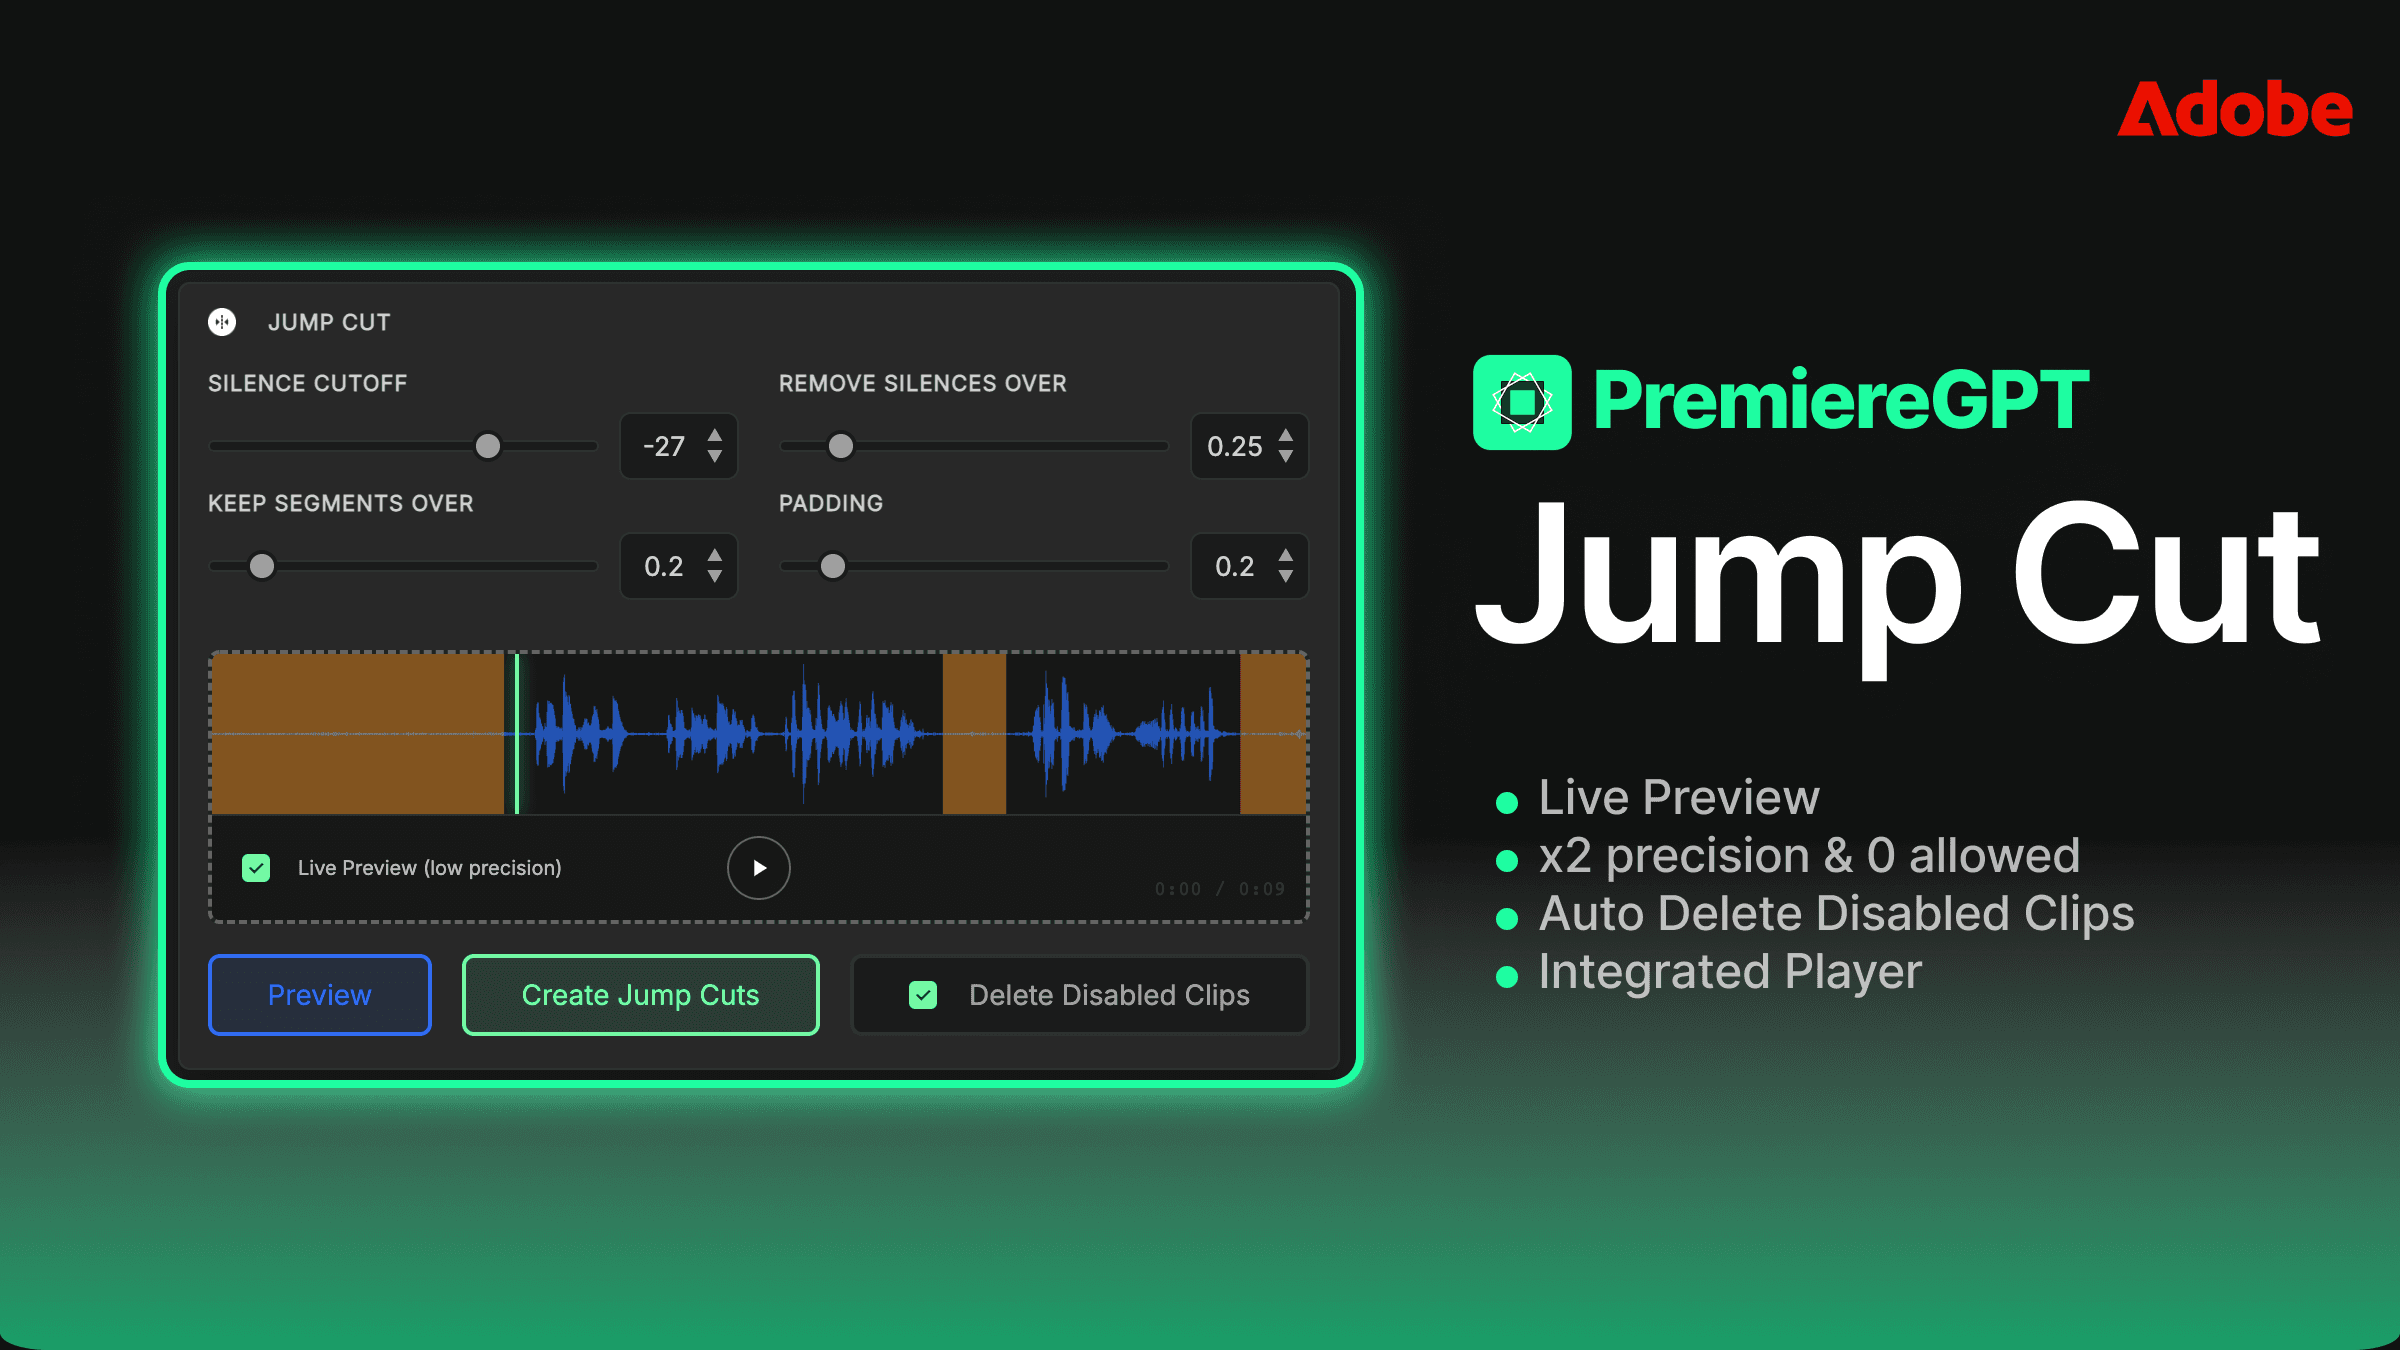
The Jump Cut Integration: Clean Silences and Switch Cameras in One Automated Pass
Multicam cutting and silence removal are usually treated as separate post-production passes. You run your multicam tool, review the cuts, and then run a separate silence removal tool to clean up the dead air, the "ums," the false starts, and the cross-talk pauses that make podcast audio feel unpolished.
The more efficient approach — and the one that serious podcast editors should be demanding from their tools — is integrated jump cut processing within the same automated pass as the camera switching logic.
Here's why this matters technically: silence detection and active speaker detection are reading the same audio data. When the algorithm identifies a period of silence or sub-threshold audio activity, it has already determined that no active speaker is present. That's simultaneously a jump cut candidate and a natural camera transition point. Processing these two decisions separately means you're analyzing the same waveform data twice and making two passes through your timeline when one would suffice.
An integrated workflow that handles both camera switching and silence removal in a single pass produces a cleaner result with less timeline disruption. Your cuts happen at silence boundaries, which means your jump cuts are also your camera switches — the visual edit masks the audio edit, and the overall result feels more intentional and less mechanical.
For podcast editors specifically, this integration is the difference between a tool that saves you 30 minutes and a tool that saves you two hours. The silence cleanup on a 90-minute, 10-person panel discussion, done manually, is a multi-hour task. Done in a single automated pass alongside the multicam switching, it's part of the 60-second workflow described above.
This is the workflow Premiere Pro's native toolset forgot to build. And it's the workflow that professional podcast editors are increasingly demanding as panel-format content becomes the production standard.
Before you run your next multicam session: Download the Ultimate Podcast Editor's Pre-Flight Checklist — a free PDF guide covering track naming conventions, audio prep for active speaker detection, mix-minus setup verification, and sync methodology to ensure the algorithm cuts perfectly on the first pass. The 60-second workflow only works if your project is set up correctly. This checklist makes sure it is.